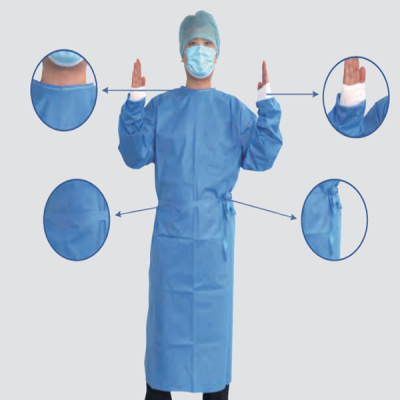


Surgical Gown

1.Description:Surgical gown(EO STERILE)
2.Packing


3.Indications for Use:
Surgical gown is intended to be worn by operating room personnel during surgical procedure to protect both the surgical patient and the operating room personnel from
transfer of microorganisms, body fluids, and particulate material. Per ANSI/AAMI PB70:2012 Liquid barrier performance and classification of protective apparel and drapes
intended for use in health care facilities, SMS Standard Surgical Gown and SMS Surgical Gown with Reinforcement met the requirements for Level 3 classification; BVB
Surgical Gown and BVB Splicing Surgical Gown met the requirements for Level 4 classification.
General Introduction:
Liquid Barrier Protection Classification: the liquid barrier protection classification of SMS Standard Surgical Gown and SMS Surgical Gown with Reinforcement is Level 3; and
the liquid barrier protection classification of BVB Surgical Gown and BVB Splicing Surgical Gown is Level 4;
Flammability Classification: Class I;
Operation Instruction:
Putting on the Surgical Gown
Step 1: With one hand, pick up the entire folded gown from the wrapper by grasping the gown through all layers, being careful to touch only the inside top layer, which is
exposed (see Fig.1).
Step 2: Hold the gown in the manner shown in Fig.2, near the gown's neck, and allow it to unfold, being careful that it does not touch either your body or other unsterile
objects.
Step 3: Grasp the inside shoulder seams and open the gown with the armholes facing you.
Step 4: Slide your arms part way into the sleeves of the gown, keeping your hands at shoulder level away from the body (see Fig.3).
Step 5: With the assistance of your circulator, slide your arms further into the gown sleeves, let your hands to protrude from the cuffs of the gown (see Fig.4).
Step 6: The circulator must continue to assist at this point. The circulator reaches inside the gown sleeves at the shoulder seams and pulls the gown over your shoulders and
the cuffs over your hands. Both you and the circulator must be careful that the gown cuffs are not pulled too high on the wrists. The edge of the cuff should be at the distal end
of the wrist (see Fig.5).
Step 7: The circulator then prepares to secure the gown. The neck and back may be secured with a tab or ties (see Fig.6). The circulator then ties the gown at waist level at
the back. This technique prevents the contaminated surfaces at the back of the gown from coming into contact with the front of the gown.
Final Tie of Gown
After the gloves are on, the team member is ready to complete gown tie with assistance of the circulator.
Step 1: The scrub will take hold of the pull card that holds the belt and belt tie located at waist level (see Fig.7) and pull the card away from the belt tie.
Step 2: The scrub will pass the pull card that holds the belt to the circulator (see Fig.8).
Step 3: The circulator will take hold of the pull card, being very careful not to touch the belt, and will move to the side or behind the scrub (see Fig.9).
Step 4: When the circulator is properly positioned (to the side or behind the scrub), the scrub will then take hold of the belt only being careful not to touch the pull card and pull
on the belt leaving the circulator with only the pull card in his hand (see Fig.10).
NOTE: The circulator must hold on tight to the pull card so that when the scrub pulls on the belt the tab doesn't come with the belt and contaminates the scrub.
Step 5: Now the scrub will take hold of the belt tie that is at waist level and tie the belt to it (see Fig.11).
Adjustment of Surgical Gown
After the gloves are on and final tie of the gown is done, the circulator completes his adjustment of the gown by stooping down, grasping the outside of the side seams at the
bottom of the gown, and gently pulling down (see Fig.12) in accordance with local SOP.
Removing the Surgical Gown
Step 1: After the circulator unties the neck and back ties, the team members perform the following procedure by themselves. Grasp the gown at the shoulders and pull the
gown forward and down over the arms and gloved hands.
Step 2: Holding the arms away from the body (see Fig.13), fold the gown so that the outside of the gown is folded in (see Fig.14); discard it into the linen hamper.
Period of validity: 5 years


- 步骤1通过搜索关键词找到您感兴趣的产品
- 步骤2请点击 "查询 "或 "请求会面 "按钮联系供应商,否则,您也可以咨询我们的进口顾问。
- 步骤3确认您的电子邮件后,得到供应商的回复,或我们的贸易经理会尽快与您联系。
- 步骤4与中国供应商建立无语言障碍的会议